Kerio
Revision as of 22:47, 26 October 2009 by Astropoint (talk | contribs) (New page: Instructions for Blocking external connections to DC++ using the Kerio Personal Firewall (v4.2.3) <ol> <li>Open up the main Kerio Firewall window and go to the Network Security section on...)
Instructions for Blocking external connections to DC++ using the Kerio Personal Firewall (v4.2.3)
- Open up the main Kerio Firewall window and go to the Network Security section on the left. Make sure the Applications tab is selected and click on ‘Packet Filter’ underneath the list of programs
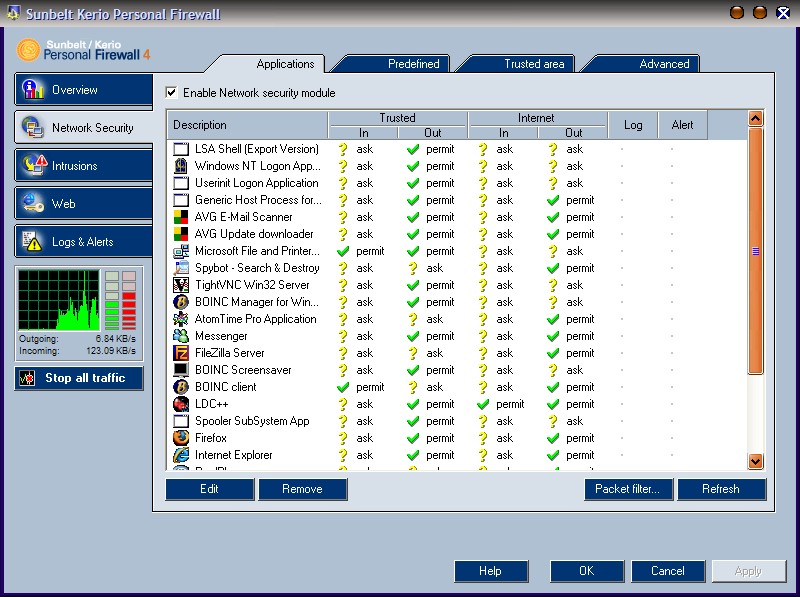
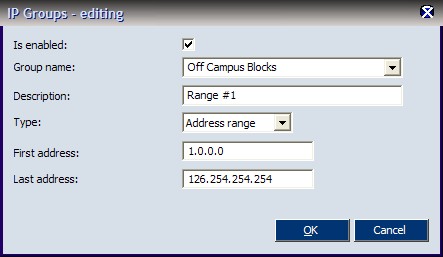
- In the window that opens up, select the IP Groups tab at the top, and then click Add.
In the box that shows up, choose a name and description for the IP range (completely arbitrary so choose what you like). In the drop down box for ‘Type’, choose Address Range
Next add the starting and ending addresses.
The first range you want to input is 1.0.0.0 – 126.254.254.254 as below
 Once this is added, click on Add again to add the next range of IPs. First select the Group Name you chose before and then choose a name for this block. Again, choose Address Range as the Type. The range this time should be 127.0.0.2 – 136.254.254.254
Repeat this process one more time and add the final range as 138.0.0.0 – 254.254.254.254.
If you click on the ‘+’ next to the Group you just created, the window you get ought to look something like this:
Once this is added, click on Add again to add the next range of IPs. First select the Group Name you chose before and then choose a name for this block. Again, choose Address Range as the Type. The range this time should be 127.0.0.2 – 136.254.254.254
Repeat this process one more time and add the final range as 138.0.0.0 – 254.254.254.254.
If you click on the ‘+’ next to the Group you just created, the window you get ought to look something like this:
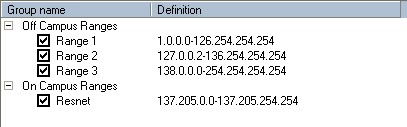
You also need to add a group for the Resnet itself to allow you to search/download whilst on the hub. Once again, click on Add, and now choose a different Group Name (something obvious). Again set it to Address Range and set the First Address as 137.0.0.0 and the Last Address as 137.205.254.254
- Next, go back to the Filter rules tab (You will be prompted to save the previous rules, do so) and click on Add to the lower left.
Again, choose a description for the rule (doesn’t need to be the same as before). Next, click on browse next to the Application box and navigate to and select the DC++ executable.
In the Protocol Section, click ‘Add’ and select TCP from the drop down list. Do this again and select UDP.
Next, in the Remote section, click ‘Add’ and select ‘Add IP group’ and choose the IP Group you created in part 2 of this guide for Off Campus people.
Make sure that ‘Both’ is selected in the Direction box at the bottom and that Deny is selected in the Action section
You should end up with it looking something like:

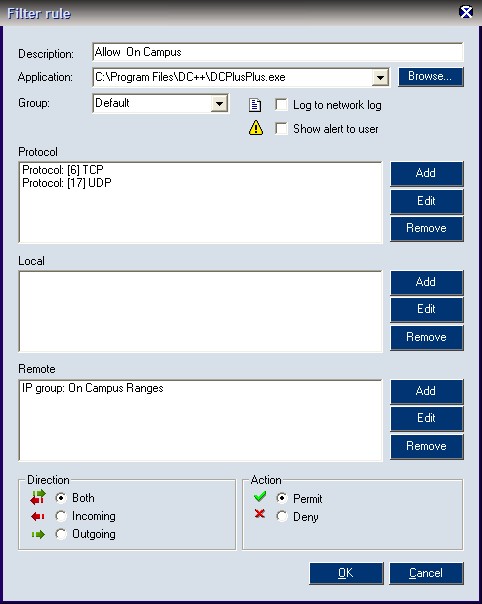
- To allow DC to download from on campus people, you need to create a new rule for DC++. In Filter Rules, click Add again. Again, choose another Description (technically arbitrary, but it might be an idea to make it somewhat useful). Select DC++ as the application and add in TCP and UDP as protocols as before.
This time however, in the Remote section, click Add and choose your IP group for On Campus IPs.
The boxes at the bottom should be set to Both and Permit giving you something as below
Make sure all the rules are saved and leave the firewall settings
Congratulations, your DC++ client ought to no longer accept connections from anybody off campus and let you download freely on campus